Links below are affiliate links. We earn a commission on purchases at no extra cost to you.
Irresistibly Juicy Salt-Crusted Tri-Tip Roast Recipe
Harness the secret of a seasoned salt crust to transform ordinary tri-tip into an extraordinarily juicy roast that will leave your guests begging for more.
Why You’ll Love this Salt-Crusted Tri-Tip Roast
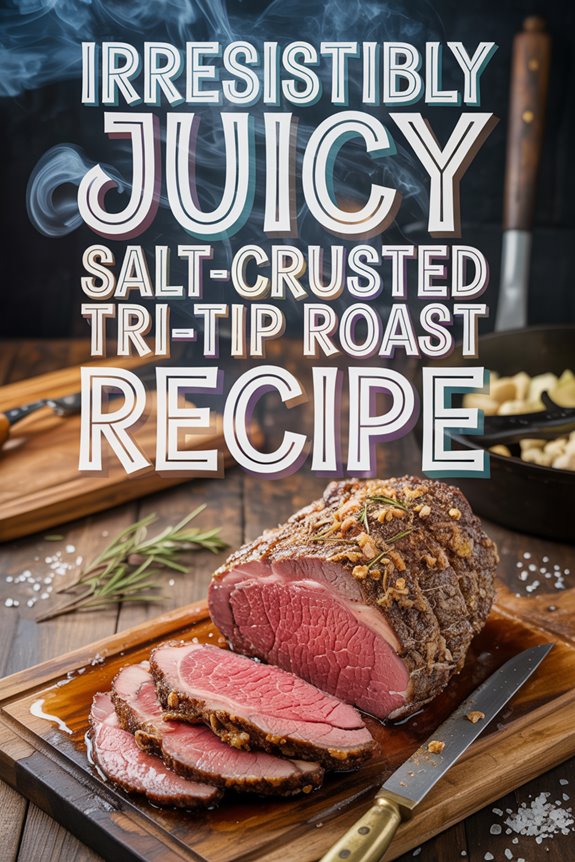
Magic happens when you coat a humble tri-tip roast in a seasoned salt crust. I’m telling you, this technique transforms an ordinary cut into something extraordinary—creating a seal that locks in moisture while infusing flavor throughout the meat.
You’ll adore how the roast expands within its salty cocoon, almost like a pillow, developing gorgeous coloration and those coveted crispy edges.
The result? Perfectly cooked tri-tip that’s juicy inside with incredible depth of flavor.
And don’t worry about timing—just 3-4 hours of resting (never overnight!) and about 40 minutes on the grill at 375-425°F. I’m always mesmerized watching the salt work its scientific magic.
What Ingredients are in Salt-Crusted Tri-Tip Roast?
Creating this mouthwatering salt-crusted tri-tip couldn’t be simpler when it comes to ingredients. The beauty of this recipe lies in its minimalist approach—just two key components that work together to create something truly magical.
The seasoned salt creates a flavorful crust that seals in all those wonderful juices, allowing the natural flavors of the beef to shine through. Who knew such an impressive dish could require so few ingredients?
- 2 pounds tri-tip roast
- 4 tablespoons seasoned salt (Lawry’s recommended)
When selecting your tri-tip, don’t be put off by its somewhat unattractive appearance in the package—this diamond in the rough transforms beautifully during cooking.
While the recipe specifies Lawry’s seasoned salt, you could experiment with other brands if needed, though I’d stick with the classic for your first attempt.
The ratio of salt to meat is important here; you need enough to create that complete seal around the surface, but not so much that it becomes overwhelmingly salty.
The simplicity of these ingredients means quality matters, so opt for the freshest tri-tip you can find for best results.
How to Make this Salt-Crusted Tri-Tip Roast
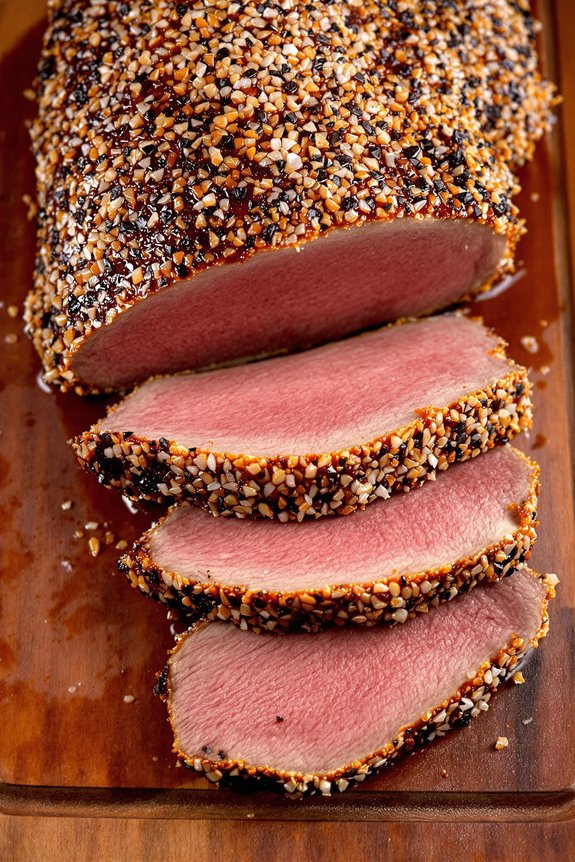
To create this mouthwatering salt-crusted tri-tip, start by thoroughly coating your 2-pound roast with 4 tablespoons of seasoning salt, like Lawry’s. This isn’t just a light sprinkle—you want to create a complete seal around the entire surface of the meat. The salt forms a crust that locks in juices and flavors during cooking.
Once coated, refrigerate the roast for 3-4 hours, but be careful not to let it sit overnight as that would be too long. About an hour before grilling, take the meat out of the fridge to allow it to come to room temperature.
Set up your charcoal grill for indirect cooking, maintaining a temperature between 375-425°F. Using a grilling rack is essential to prevent grill marks from scoring the roast and to catch the considerable amount of juices that will release during cooking. A high-quality cast iron grill set provides even heat distribution that’s perfect for cooking tri-tip to perfection.
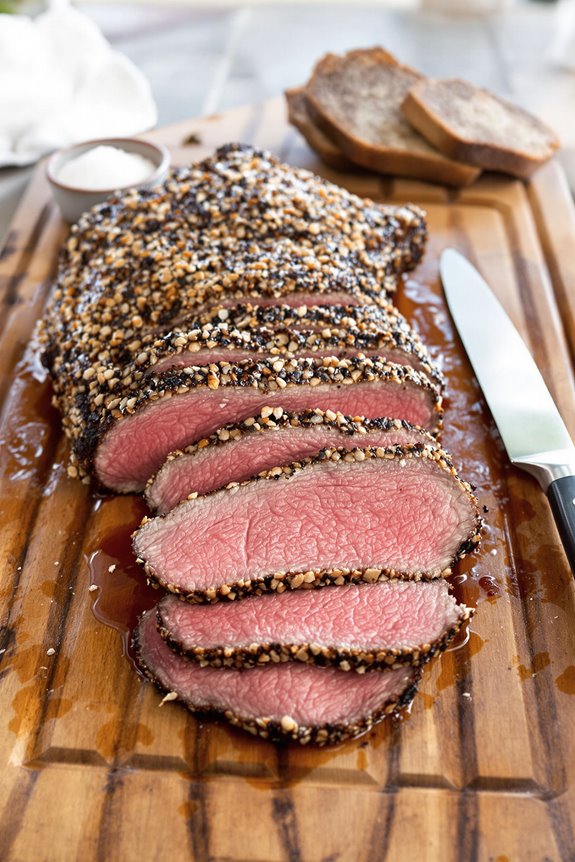
With the grill cover on, cook for 20 minutes, then flip the roast just once. After about 40 minutes total, check the internal temperature. When the meat reaches 135°F, remove it from the grill. You’ll notice the roast has changed shape—expanding within its salt-sealed layer, sometimes puffing up like a pillow with attractive colors and crispy edges.
Let the roast rest for 10 minutes before slicing, giving the juices time to redistribute throughout the meat. You’ll need a deeply grooved cutting board to catch the significant amount of liquid—easily half a cup or more.
When slicing, pay careful attention to the changing direction of the grain pattern in tri-tip. Always cut across the grain, keeping slices small and thin, which makes them perfect for sandwiches or serving on rye bread slices. This attention to slicing technique makes all the difference between tender, melt-in-your-mouth bites and chewy disappointment. Wouldn’t we all rather have the former?
Salt-Crusted Tri-Tip Roast Substitutions and Variations
While the traditional salt-crusted tri-tip uses Lawry’s seasoning salt, you can easily customize this recipe with several delicious variations that’ll transform your roast.
Try mixing in smoked paprika and cracked black pepper for a more complex flavor profile, or go bold with a tablespoon of coffee grounds mixed into your salt rub—it creates a magnificent crust that’ll have everyone asking for your secret.
For an herb-forward approach, combine your seasoning salt with 2 tablespoons of fresh rosemary and thyme.
I’m particularly fond of adding a teaspoon of brown sugar to the mix, which caramelizes beautifully during cooking, creating those irresistible crispy edges.
What to Serve with Salt-Crusted Tri-Tip Roast
Since your salt-crusted tri-tip brings such bold, savory flavors to the table, you’ll want side dishes that complement rather than compete with this showstopper.
I’d recommend a bright, acidic counterpoint like a simple arugula salad with lemon vinaigrette, or roasted vegetables that develop their own caramelized sweetness—think colorful bell peppers, red onions, and zucchini tossed with olive oil and herbs.
For starches, crusty sourdough bread is perfect for soaking up those precious meat juices, while garlic-herb roasted potatoes provide a hearty foundation.
Don’t forget a robust cabernet sauvignon or zinfandel to stand up to that beautifully seasoned beef!
Final Thoughts
Salt-crusting your tri-tip roast creates a truly remarkable transformation, turning an ordinary cut into something extraordinary through this deceptively simple technique.
The magic happens as that salt seal locks in juices while allowing the meat to expand like a flavor-filled pillow within its seasoned cocoon.
I’m constantly amazed by how this humble cut responds to proper handling—respecting the resting time (never more than 4 hours!), maintaining that perfect 375-425°F temperature range, and most importantly, slicing correctly across those changing grain directions.
Trust me, your guests will never guess how little effort it took to achieve such mouthwatering results.